Every now and again, I will have a massive homesickness attack which renders me hungry. Yes, my friends. Unfortunately, homesickness for me always equates to missing food from my home land.
Luckily for me, these days, whenever I have the urge for Malaysian food, all I have to do is either visit one of the many Malaysian restaurants here in Melbourne or google a recipe online. Technology rocks.
On one particular weekend, I decided I must have curry puffs. Knowing that it required a bit of work (but not how much), I put aside a few hours to get it started.
Let’s just say, I’m never going to complain about the prices of curry puffs when I visit Malaysia ever again! For RM0.50-RM 1.00 per curry puff at markets (depending on where and ingredients used) or shops RM 3.50-RM5.00, I’m never going to complain again.
Why was this so hard? Well, I could have gone the cheap and easy route and used pre-made puff pastry. But I wanted to be authentic and needed the more traditional curry puff to satiate my cravings.
After scouring the internet and coming close to giving up, I came across Samantha Tan’s blog with this recipe. It’s really easy to follow, as she’s given a step by step guide. I thought I’d do the same (just in case you decided you needed Malaysian Curry Puffs in your lives).
This recipe makes about 30 small curry puffs or 20 mid-giant sized ones (which I made as I got tired 😛 ). For this super flaky treat, this recipe incorporates two types of dough (a grease dough and a water dough). The harder of the two is definitely the grease dough, and because I have no stand mixer, my trusty arm muscles were put to good use!
Spiral Curry Puffs (Karipap Pusing) Recipe
Ingredients
For the Water dough:
- 300 g Plain Flour
- ½ tsp Salt
- 125 ml or 1/2 cup lukewarm Water
- 1 small beaten Egg
- 1 Tbsp of Oil
For the Grease dough:
- 150 g Plain Flour
- 75 g cold Butter
For the Curry Puff filling:
- 1 large Onion (finely chopped)
- 2 cloves of Garlic (finely chopped)
- 2 Tbsp of good Curry Powder (I used a standard meat curry powder)
- 3 large Potatoes (cut into small cubes)
- 100 g of Chicken Breast (diced)
- 250 ml or 1 cup Water
Instructions
- Start by cooking the curry puff filling, whilst the filling cools, you can get started on the dough.
- Saute the onion and garlic in a wok (or a pan) over medium heat. Add the potatoes and stir fry until it softens. Add in the chicken and curry powder.
- Ensure that everything is coated in the curry powder before adding in the water. Add the water slowly (little by little) and allow the curry to simmer.
- Once the potatoes have soften and the curry forms a dry curry mixture, set aside and let cool.
Water Dough:
- Combine ingredients and knead with your fingers until the dough becomes soft, pliable and non-sticky. Divide and roll the water dough into two equal balls. Cover and set aside to rest for at least 30 minutes.
Grease Dough:
- Cube the butter and cut into the flour with two knives and a fork until it resembles crumbly coarse sand. Knead by hand until it turns shiny and smooth (dough-like consistency). This process takes a while so get ready for a work-out! Divide and roll into two equal balls.
Forming the curry puffs:
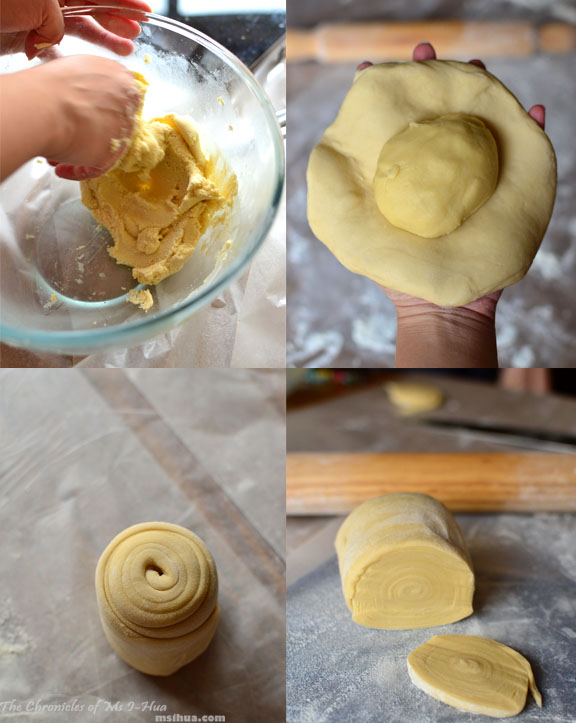
- Enclose one ball of greased dough into the water dough. The water dough is very pliable so this will be easy to do.
- On a lightly floured surface roll the combine dough into a thin oval shape with a rolling pin. Roll it up and with one end facing you, roll the dough out again into a thin layer.
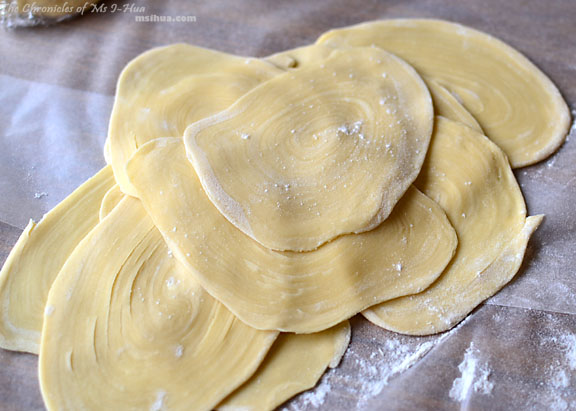
- Roll the dough up again (see pictorial) before slicing into 1cm disc. Depending on the width of each slice, the number of curry puffs made will differ (larger width, bigger curry puffs).
- Flatten each disc (spirals will be visible at this stage) with care as the dough can easily split into layers.
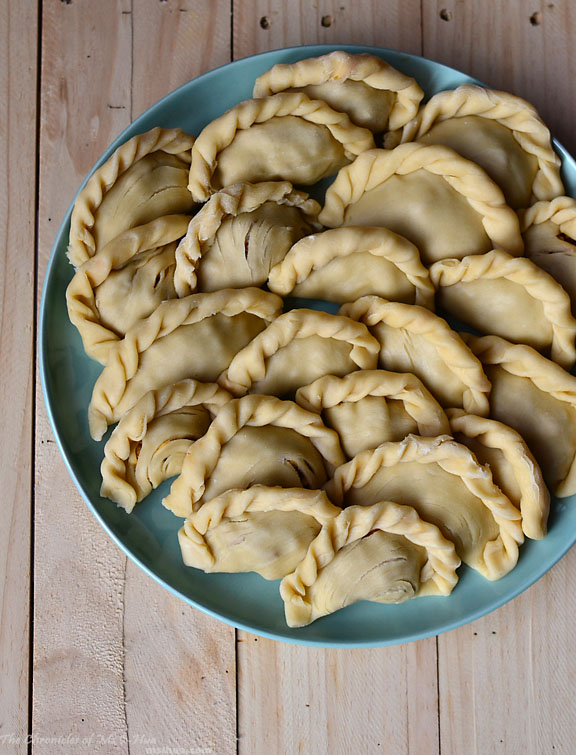
- Place a tablespoon (or two) of the curry puff filling into the centre of the flatten disc and fold over. Seal the edges of the dough together by pinching and folding the flour to form a rope. (If you have a curry puff mould, use it!)
- To cook, simply deep-fry in hot oil until golden brown. Serve warm!
Notes
To help you in making these luscious curry puffs, we’ve put together a montage to show you how it’s done!
For a clearer step-by-step guide, I’d suggest visiting Samantha’s blog post!
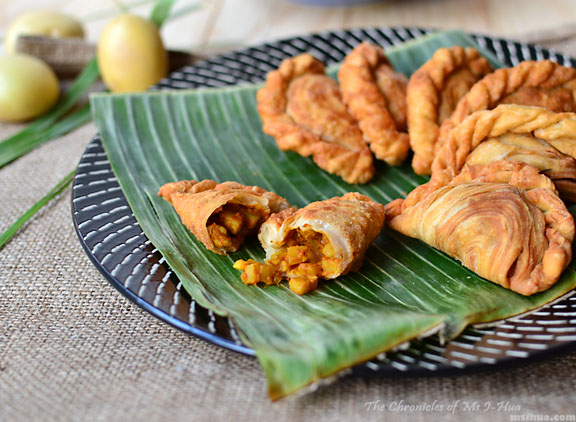
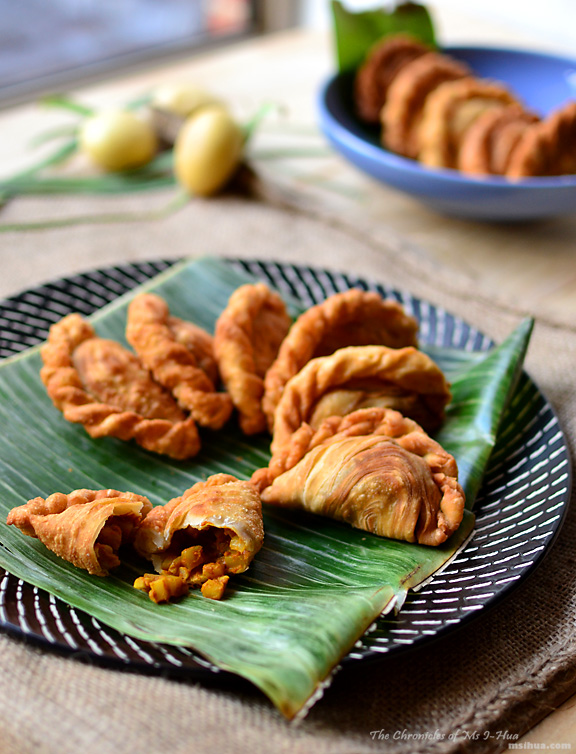
I found the rolled out discs to be very pretty. I was quite happy with the overall end result.
If I was to be mad enough to attempt this again, I’d probably roll them up to be smaller so as to not have too much excess dough. And I would probably improve on my crimping skills the next time.
All the curry puffs crimped and waiting to be deep fried!
The Boy and I happily ate these as snacks and pre-dinner treats for a couple of days. It definitely was delicious and worth the time and effort which I put into making them.
Would I be jumping back to quickly make these again? Probably not until the craving hits me badly enough. I’ll just wait for the next visit home to Malaysia 🙂
A little historical note on curry puffs in Malaysia.
If you think that these look a tad familiar and may have seen them in other cultures, though a little differently, you’re not far behind on that logic.
Curry puffs are a hybrid of Samosas and Empanadas which were introduced to Malaya during the spice trading days. Absorbed by the locals, the fillings of curry puffs have changed to suit the local tastes and transformed into the curry puffs you can find today in Malaysia.
Interesting curry puff fillings I have come across over the years includes one that is completely filled with fresh Durian paste! Most traditional curry puffs will only have potatoes in the curry.
The recipe above is a modification of this with the addition of chicken pieces.
Enjoy!
Wow, you are a flaky dough goddess! I always wondered how to make dough like that (the Maltese use a similar dough for a ricotta-stuffed pastry). I am going to try your curry puffs and attempt the pastry myself… will let you know how it goes!
Not sure about the goddess bit, but it was a success!
Very impressive that you didn’t skip a step at all, and I so bet you could tell the difference. Just look at those gorgeous spirals- yummo!
Well I needed the real thing!
What gorgeous curry puffs! I LOVE the spiral pattern 🙂 And I’m so sorry to hear that you’re homesick!
Haha Usually only homesick for food 🙂 Tis’ okay!
Oooh, these look fabulous! I’m sure the homemade pastry made a massive difference too … convenience can be tempting but it looks to me like the results of the extra work were well worth it! 🙂
Uhuh uhuh uhuh!
Love love love the spiral puffy pastry!!! I’ve never had these before but would love to try 🙂
Ooohh never? Maybe I can find them to buy for you.. don’t think I’ll be making them again without a stand mixer!
Oh you have done a fantastic job with these, they look amazing! …but now I miss Malaysia and the yummy food all over again… you don’t have any leftovers do you 😉
Awww.. leftovers? HAHAHAHA
These look amazing!!
Should they always be deep fried or do you think they’d work baking them?
I have heard of other people baking these for a healthier option, but the pastry just doesn’t flake enough or is as crispy. You could give it a shot!
these look devine! sometimes homesick foods have to be handmade to have the same oomph~
Completely 100% agree 🙂
Uaaau this is amazing:) Love it!
Aww thanks!
Omg, these look so amazing! Despite how difficult you said they were, I’m so inspired to give them a go at home! 🙂
Let me know how it goes!
Dear Ms I-Hua,
LOL Karipap – spoken like the Malay makchik in the corner hawker stall in KL. Looks wonderful although I don’t miss most Malaysian food except for those I can’t replicate at home. The quality of hawker food in Malaysia are pretty crap these days anyway.
The makcik’s are the best!! I can replicate most things, but most of them are so tedious, I would rather just wait for the trip home!
just mouthwatering….looks delicious!
Thanks!
WOW, just wow. would love to make these but i hate deep-frying!
You can always bake them… works just as well!
Hi! I’m so fallen in love with your karipap that I had made them myself. I’m going to link your post here to my new post on karipap, if you allow me. Let me know. Thank you.
Arfi
http://www.homemadesbyarfi.com
Hooray! So happy you love it too 🙂 Sharing is caring 🙂
emmmm…your karipap looks delicious, actually i also made it 3 days ago and i still got it some inside my freezer. i think we use different recipe, but i definitely will try yours in my free time:)
you can see my karipap in http://lovelyharuna.blogspot.com
Aww thank you!
Just saw this post, thank you very much for linking back to my blog and I’m glad my recipe worked for you!:) They look beautiful xx
Regards,
Samantha Tan
Thank you!
I am going to try this at home, teens cooking in the kitchen
Gonna be a delicious mess!
Can I used mixer to knead instead of hands? If want to bake what is the temperature and how long to bake them? Thank you:)
mine didn’t turn out anywhere near as crispy or flaky as yours – even tho I followed the recipe exactly. May I know what went wrong?
Also do you mind giving detailed instructions on how to pleat? I had no idea how to do it even with the explanations above
Wow, these karipaps looks stunning. Look at the spirals. Simple yet complex – I’ve been researching and looking at different karipap recipes to test out and this looks pretty good. I’ll most likely give this a try!
karipaps looks crunchy and mouth watering,
nice post with details, because of asian spices makes it better.